Wednesday, September 25, 2013

$30 DIY Fall Wreath

I always find myself wanting to make a new wreath every fall. Through Pinterest I stumbled upon a very cute wreath that sold for $85 on Etsy....holy cow! $85? 

Well, of course, I headed to Hobbly Lobby knowing I could make the same exact wreath for much less. See below how to make a sophisticated fall wreath for only $30 in about 30 minutes...that's my kind of craft!

What you will need:
-9 large flower blooms (mine came from Hobby Lobby) $27
-1 22-24" grapevine wreath 
-Hot glue
-Ribbon (for hanging)


These are the flowers you will be looking for. I chose three colors and purchased three of each color. Regular price is $6 each but WAIT until they are 50% off, promise me.

Cut the stems off of each flower. Don't be alarmed if the flower head separates into two pieces. Simply hot glue them back together and you're good. 


Arrange your flowers onto your wreath and then hot glue them in to place.


Now it's time to glue the green leaves onto your wreath. 


How easy is that? Now simply choose a wide ribbon that coordinates with your flowers and hang your wreath. 


There you are! An easy fall wreath that looks like a million bucks...for just a little over $30.

Happy Fall Everyone!


Monday, July 1, 2013

$15-ish Entryway Table Makeover

Secondhand furniture is the best.  It's inexpensive, well built, and just needs a little TLC to be brought back to life.  Every single piece of furniture currently in our house is secondhand or handmade...and I am proud of it!  Most of the pieces have a story to tell and are one of a kind because we have re purposed them. 

Well folks, I just added to our collection of secondhand furniture!  I was out and about one day and stumbled upon a secondhand furniture store that had just opened up, I had to check it out....

...and here is what I walked out with.  


It was priced at $20 but I bought it for $15.  Score!  

Long story short....I gave it three coats of paint that I already had from a previous project and spray painted the bottom of the feet with gold spray paint that I already had.  So for $15-ish I turned this eyesore into this....


I love how it brightens up our entryway and I can only imagine the many ways we will be able to use this piece of furniture for many years to come!  So look around when you are out and about...you never know what you might stumble upon....I hope you LOVE IT!  Be sure to check out our entire updated entryway here.


Monday, June 17, 2013

Updated Entryway

I must admit, I am a serial decorator...after holidays around here I always try to freshen up our decor.  I've always done this and always will...I have the "can't help its".

For this reason, our entryway got a makeover today!  It's been an ongoing process but I am "currently satisfied" with how it looks....and the best thing....it was inexpensive! (don't use the word cheap)


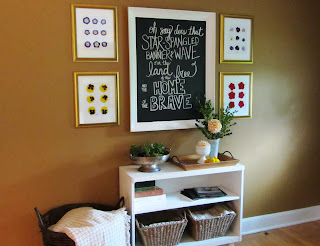
Have you ever heard the phrase "Bringing The Outdoors In"?...I believe I nailed it.  All of the flowers in the frames I just picked today and the gorgeous Seattle Dahlias (on the table) have been one my favorites in the flower garden.  The Jade Plant (in the bowl) was a gift from a dear friend and blooms in the winter months, but the green color is great to have indoors.  

I mentioned the entryway update was inexpensive, below is the breakdown:

the chalkboard cost me a mere 6-ish dollars to make...
                           ...the table cost me 15-ish dollars to transform...check it out here!
                               ...the frames were $10 a piece from Hobby Lobby...
                                   ...and all of the flowers were FREE (kind of)...
                                       ...and I had everything else somewhere in the house already.


I will have details on each project in upcoming posts so check back for more. And as always...I hope you Love it!

Wednesday, March 20, 2013

$3 Easter Egg Decoration

I'm all about an inexpensive find...especially when it looks good. I give you the $3 Easter Egg Decoration that you can do too!


How and where you say? Target is selling a package of six faux Easter eggs for $1...with the grass! I know. Hobby Lobby sells a dozen faux eggs for $7, but they do look a little nicer having a more natural look. I actually used both in our house to get more bang for my buck.

But back to the $3 decoration...

What you need:
- cake plate
- glass dome
- packages of faux eggs from Target ($1 per package)

How you do it:
- place eggs in upside down dome
- place fake straw on top of eggs
- put cake plate on top of dome
- flip dome over

How easy and simple is that? I hope you Love it!  


Tuesday, March 5, 2013

Easy Bunny Silhouette Project

Hippity Hoppity Easter's On It's Way!  Do you have 10-15 minutes of free time? What about white paper or cardstock?  Yes?  Let's make a bunny silhouette for some inexpensive (practically free) Easter decor!


How you say?  Below are the step by step instructions:

1 - Go to http://openclipart.org/people/kuba/1296480840.svg and print out the bunny clipart onto regular paper.


2 - Cut out the silhouette of the bunny, trace onto card stock and cut shape out of white card stock.


3 - Find anything with a flat surface (and the size you would like) and wrap burlap around object.  Use hot glue to secure.  I used a flat artist canvas panel I had lying around from a project I goofed on.  You can use anything from cardboard, a cereal box, a shoe box lid....literally anything.


4 - Hot glue card stock bunny to front of burlap panel.  Try to use as little glue as possible and smooth out the glue quickly with clean hands.  Annnnd you're done!  How easy is that?


You can make this project as large or as small as you like.  Whatever works for your space.  I adore how simple and sweet this little guy (or gal) is.  It really stands out but works well with what I have out for Easter.


So what are you waiting for?  Start on your little bunny and please let me know how it goes.  Everyone could use some bunny cuteness in their space.  Happy Easter!


Tuesday, December 18, 2012

Fresh Christmas Decorations

There's nothing better than the smell of a fresh Christmas tree in your house for the holiday season.  But why stop there?  Spruce, evergreen, boxwood, magnolia leaves, pine cones, the list goes on and on......and the best part?  All of these things can be found for free!  

So why not use nature to decorate?  It adds a warmth and scent to your home that cannot be accomplished with anything else. 

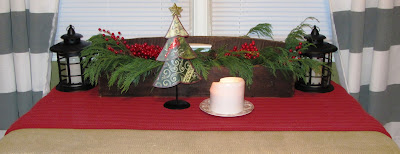
I was able to use cypress tree branches, boxwood stems, logs (yes, logs) and clippings from our Christmas tree.  Below are a few ways I used them to decorate our place this year. 


Beautiful boxwood garland right?  Well, Murphy (our giant schnauzer) actually picked that out.  Yep.  We were shopping at an outdoor craft fair and Murphy...well...marked it.  Yes, he peed on it.  After the look of horror faded from my face I gladly paid two lovely ladies for the garland.  Don't worry, I hosed it off VERY well and let it dry for two days in the sun before I brought it into the house.  Atleast he has good taste right?


Bringing the outside inside was very fun to do this year.  Free, beautiful, simple and easy....

What fresh things have you used to decorate with this Christmas?